What Are HTTP and HTTPS?
HTTP and HTTPS are types of transfer protocol. HTTP (or Hypertext Transfer Protocol) is the traditional protocol we use to access the web from a browser—an order and syntax for presenting information to transfer data over a network.
HTTPS is just HTTP with secure encryption and verification.
This is provided through SSL encryption (via a secure certificate from a third-party vendor). And keeps your connection to the server secure.
Security is a top priority for Google. Which means you should use HTTPS on your site if you want to rank.
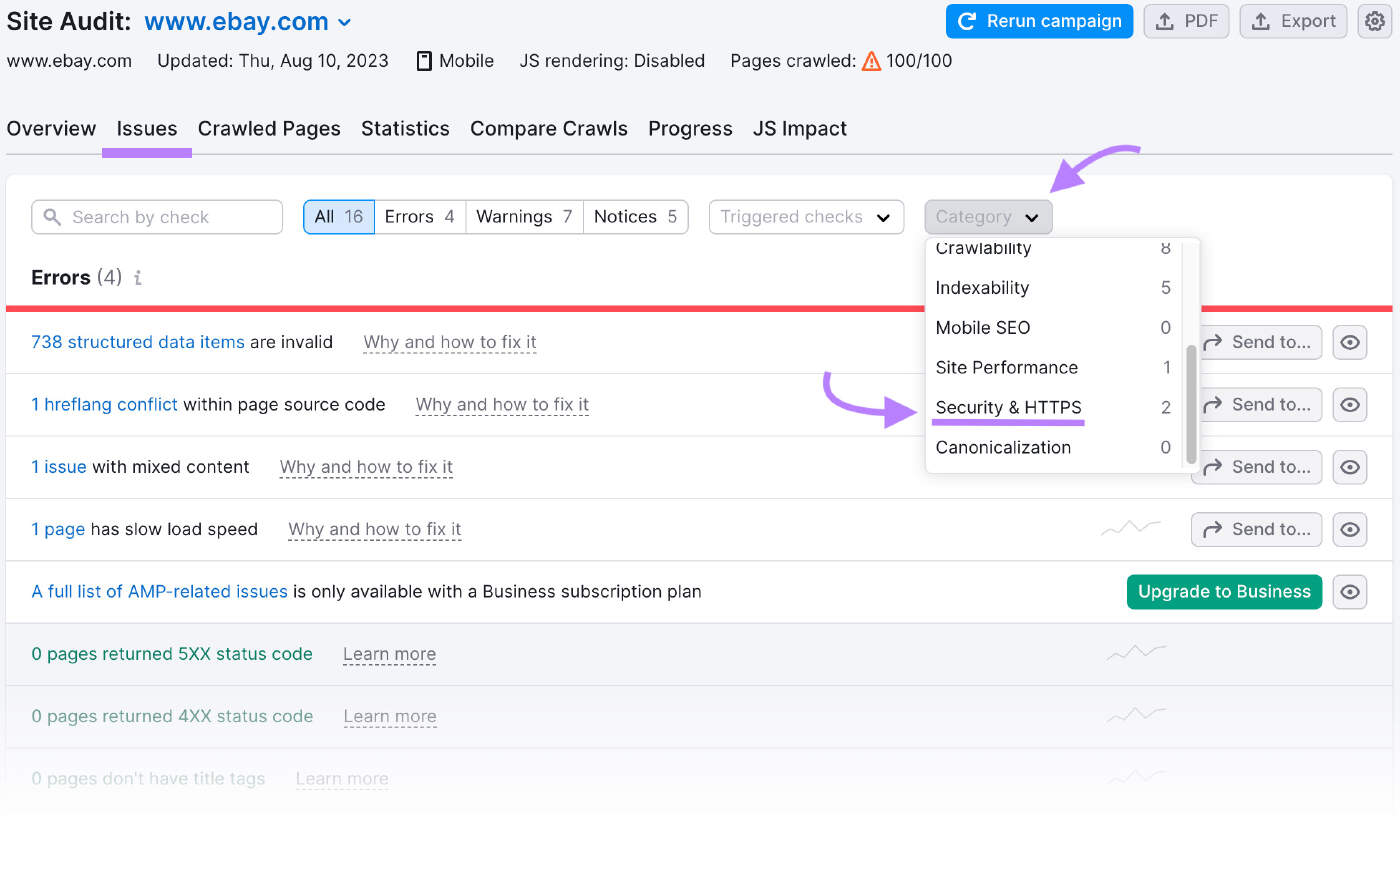
To check your site for security and HTTPS issues, use Site Audit.
Enter your domain and click “Start Audit.”

Then, head to the “Issues” tab.
And use the “Category” filter to select “Security & HTTPS.”
Why Should You Change to HTTPS?
Google announced in 2014 that HTTPS would be used as a ranking signal to encourage websites to prove that they will keep user data as safe as possible.
As a site owner, using HTTPS is another way of showing users that your site is legitimate and secure.
Essentially, using an HTTPS protocol is an SEO best practice. And shows users that you’ve got the E-E-A-T factor: Experience, Expertise, Authoritativeness, and Trustworthiness.
This is pretty invaluable, so if you’ve still got an HTTP protocol, it’s definitely time to think about making the switch.
Further reading:
- Everything You Need to Know About HTTP vs. HTTPS
- What Are E-E-A-T and YMYL in SEO & How to Optimize for Them
How to Redirect from HTTP to HTTPS
Setting up the redirect from HTTP to HTTPS on your website will depend on your site’s host. However, there are some preliminary things you can take care of before you even look at the specifics:
- Choose an SSL certificate for your site
- Tell Google about your new protocol
- Update your internal links
1. Choose a Certificate for Your Site
To make everything official, you’ll need to get your hands on a Secure Sockets Layer (SSL) certificate. An SSL certificate is a third-party confirmation that your connection and site are legitimate.
An SSL certificate will include:
- The server name
- The certificate authority
- The server’s public encryption key
The SSL certificate encrypts the messages between your site and the user. It locks other users out and prevents them from reading or stealing private information such as credit card details or passwords.
2. Tell Google About Your New Protocol
Google considers the HTTP and HTTPS versions of one site to be two different websites. So it’s important that you inform them about your redirect.
You’ll want to ensure that sure users are directed to the right version of your site when they try to access it.
Start by heading over to your Google Search Console account to verify the HTTPS version of your site.
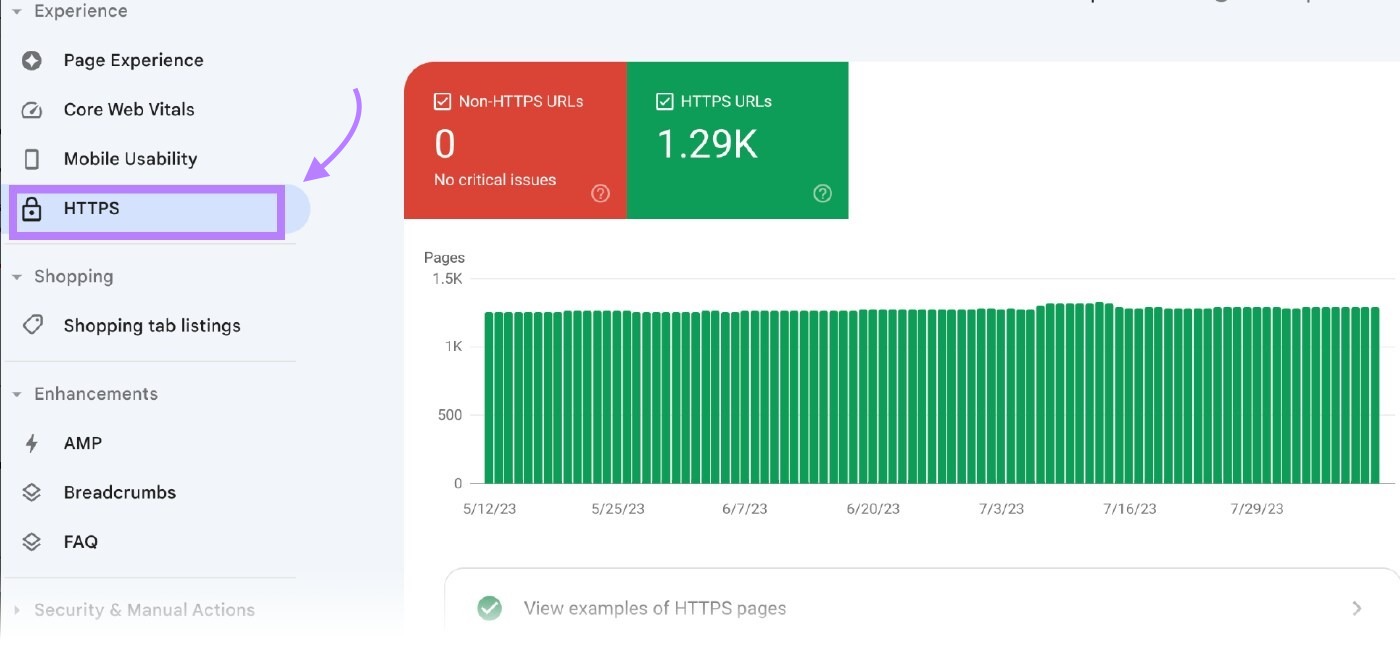
Make sure you use the same email address you use for your Google Analytics account to guarantee that your ownership of the domain is confirmed.
The transfer could take a few days, but your redirect will be good to go.
3. Update Your Internal Links
Once the redirect is sorted, it’s time to check that your internal links have HTTPS URLs and continue to work correctly.
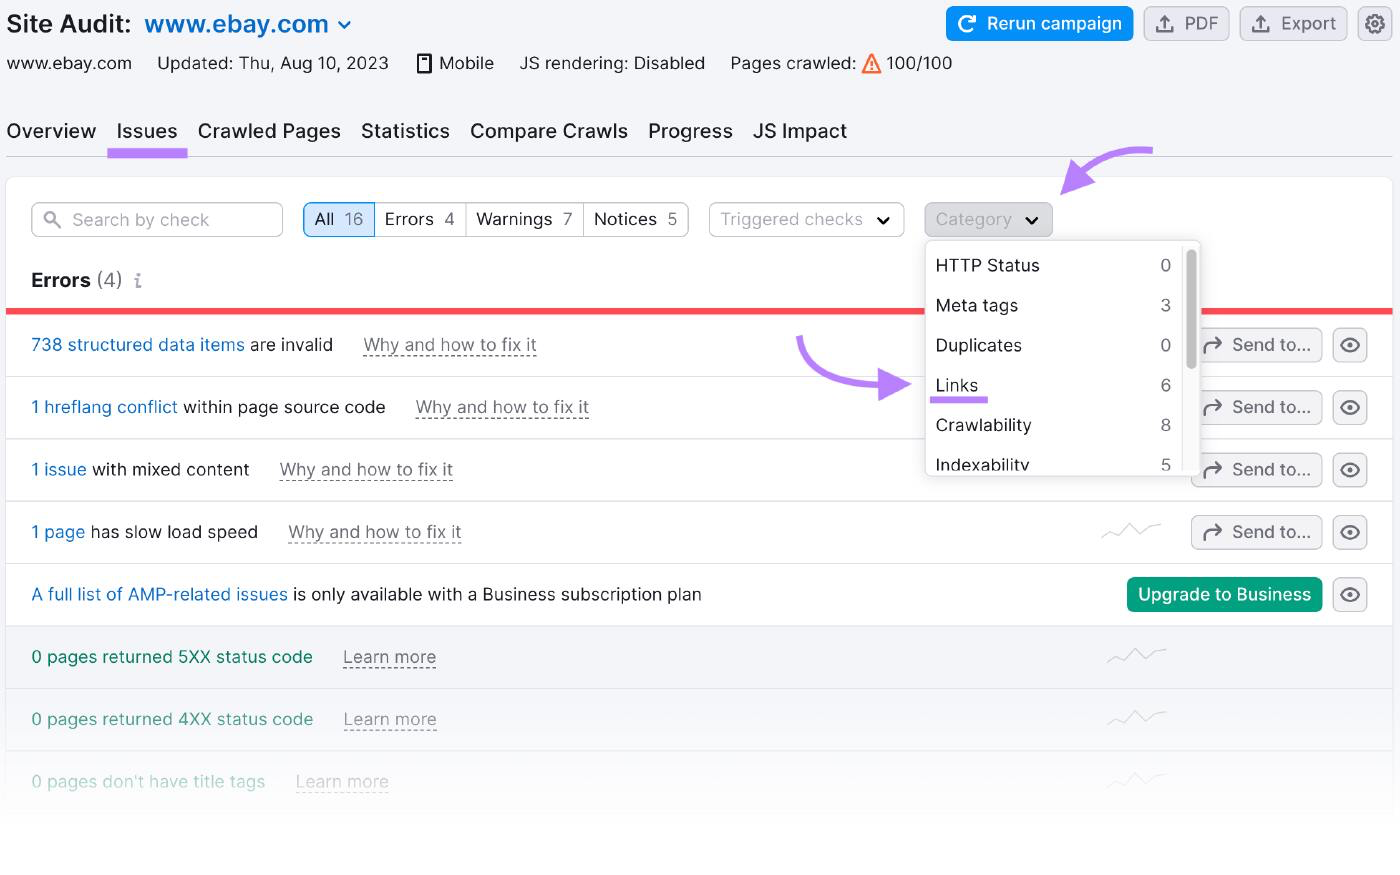
You can check what needs changing by using a site crawling tool to scan for any dodgy links. We recommend you use Site Audit.
In the “Issues” tab, use the “Category” filter to choose “Links.”
How to Redirect to HTTPS in WordPress
If you run your website through WordPress, there are a couple of different ways to go about redirecting HTTP to HTTPS.
- Use a Plugin
- Edit WordPress files manually
Here’s how:
1. Use a Plugin
This is a super easy method for beginners.
First, install an SSL plugin, then activate it. The plugin does the following automatically:
- Checks your SSL certificate
- Directs WordPress to use HTTPS in URLs
- Sets up redirects
- Looks for any URLS that still load via HTTP and redirects them
You’ll need to keep the plugin active on your site after it’s installed; deactivating it could lead to performance and content errors.
2. Edit the WordPress Files Manually
To edit your WordPress files, visit your General Settings and update your WordPress and site URL addresses to HTTPS rather than HTTP.
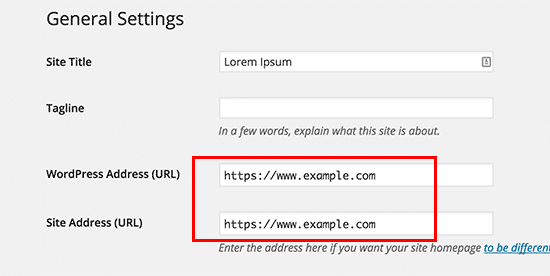
Then set up your redirects in your .htaccess file:
<IfModule mod_rewrite.c>
RewriteEngine On
RewriteCond %{HTTPS} off
RewriteRule ^(.*)$ https://%{HTTP_HOST}%{REQUEST_URI}
[L,R=301]
</IfModule>
Look confusing? Here’s the breakdown:
- “RewriteEngine On” enables the rewrite
- “RewriteCond %{HTTPS} off” checks for the HTTP connection
- “RewriteRule ^(.*)$ https://%{HTTP_HOST}%{REQUSEST_URI} [L,R=301]” redirects HTTP to HTTPS with a 301 status code
Now WordPress should load your site with HTTPS.
How to Do an HTTP Redirect in Nginx
If you host with Nginx, there are a couple of ways to redirect your HTTP to HTTPS.
- Redirect all HTTP sites to HTTPS
- Redirect specific sites
1. Redirect all HTTP sites to HTTPS
Use this method when you know that you want all your sites to exclusively use HTTPS. You simply make a change to your Ngnix configuration file:
server {listen 80;listen [::]:80 default_server;server_name _;return 301 https://$host$request_uri;}Here’s what the code actually means:
- “listen 80 default_server” establishes the server block as the default for any unmatched domain
- “return 301 https://$host$request_uri” redirects any traffic to the correct HTTPS server block. $host holds the request domain name
2. Redirect Specific Sites
This is the go-to option if you have multiple apps or sites and don’t require an SSL certificate for each one. Again, all it takes is a simple change in your code:
server { listen 80; server_name example.com; www.example.com; return 301 https://example.com$request_uri;}As you can see, this code doesn’t designate a “default server.” Instead, it focuses on the specific host name.
Let’s break it down:
- “listen 80” ensures that the server block will ‘listen’ for any connections on port 80 (HTTP)
- “server_name example.com; www.example.com” ensures the server domain names are specified. Of course, your domain name should be subbed for “example”
- “return 301 https://example.com$request_uri” ensures that traffic is redirected to the HTTPS version of the site. The ‘301’ creates a redirect to the specific URI and sends the user to an HTTPS version
You’ll need to restart or reload Nginx for the changes to come into effect. From there, you’ll be ready to go.
How to Redirect to HTTPS in Windows IIS
If you use Windows IIS, there are two key steps for redirecting from HTTP to HTTPS on your site.
Step 1
- Download the IIS URL Rewrite Module
- Go into IIS Manager and select the website that needs redirecting
- Select URL Rewrite
- Click Add Rules, select Blank Rule, and then enter your rule name. Fill in the following pop-up as follows:
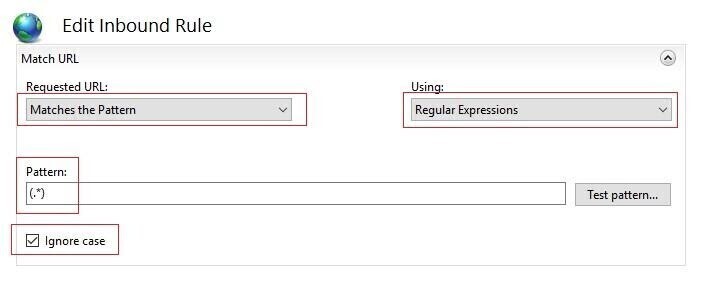
- In the next window, make the following edits:

- This will take you to the Action section. Here, you should make the following changes:
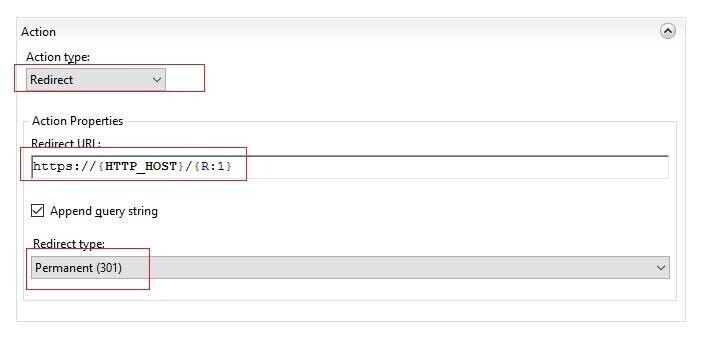
- Click “Apply.”
Step 2
- On your IIS dashboard, right-click on your site, then select Explore
- Open the web.config file
- Add the following code block (if it isn’t already there)
<configuration><system.webServer><rewrite><rules><rule name="HTTPSforce" enabled="true" stopProcessing="true"><match url="(.*)" /><conditions><add input={HTTPS}"pattern="OFF$"/></conditions><action type="Redirect" url=https://{HTTP_HOST}/{R:1} redirectType="Permanent" /></rule> </rules></rewrite></system.webServer></configuration>- Save!
How to Do an HTTP Redirect in Apache
If you use Apache, making the HTTP redirect to HTTPS is also pretty easy.
If you can access the root server, set up a redirect in the Apache Virtual Host domain configuration file.
If you can’t, then you can go into your .htaccess file and make the changes there.
Redirect with Apache Virtual Host
When you use the Virtual Host, you specify your generic site document root and then customize the security policy for the separate sites.
Use a simple redirect directive like this:
<VirtualHost *:80> ServerName example.com ServerAlias www.example.com Redirect permanent / https://example.com/<VirutalHost *:443> ServerName example.com ServerAlias www.example.comIn closer detail, all this works out pretty simply:
- “VirtualHost *:80” listens for connections on the 80 port (HTTP) for the domain you’ve specified
- “VirtualHost *:443” listens for connections on the 443 port (HTTPS)
- Replace “ServerName” and “ServerAlias” with your domain name
- “Redirect permanent / https://example.com/” enables the redirection of traffic to the HTTPS site
Restart your server and it will take effect.
Redirect with .htaccess
If you’re redirecting with .htaccess, you’ll need the mod_rewrite module – but don’t worry, that’s a default on most servers.
Just open your root .htaccess file and add the following code:
RewriteEngine OnRewriteCond %{HTTPS} offRewriteRule ^(.*)$ https://example.com/$ [L,R=301]Let’s dive deeper:
- “RewriteEngine On” enables the rewrite
- “RewriteCond %{HTTPS} off” checks for the HTTP connection
- “RewriteRule ^(.*)$ https://example.com/$1 [L,R=301]” This redirects HTTP to HTTPS with a 301 status code. Just make sure you put your domain name where ‘example’ is
The bonus of redirecting with .htaccess is that you don’t need to restart anything for it to take effect.
Check Your HTTPS Implementation
To easily check if you’ve implemented HTTPS correctly on your site, use Site Audit.
The tool can check for any technical SEO errors on your site, and suggests how to fix them.
If you’ve run a site audit recently, visit the tool overview and select “HTTPS.”
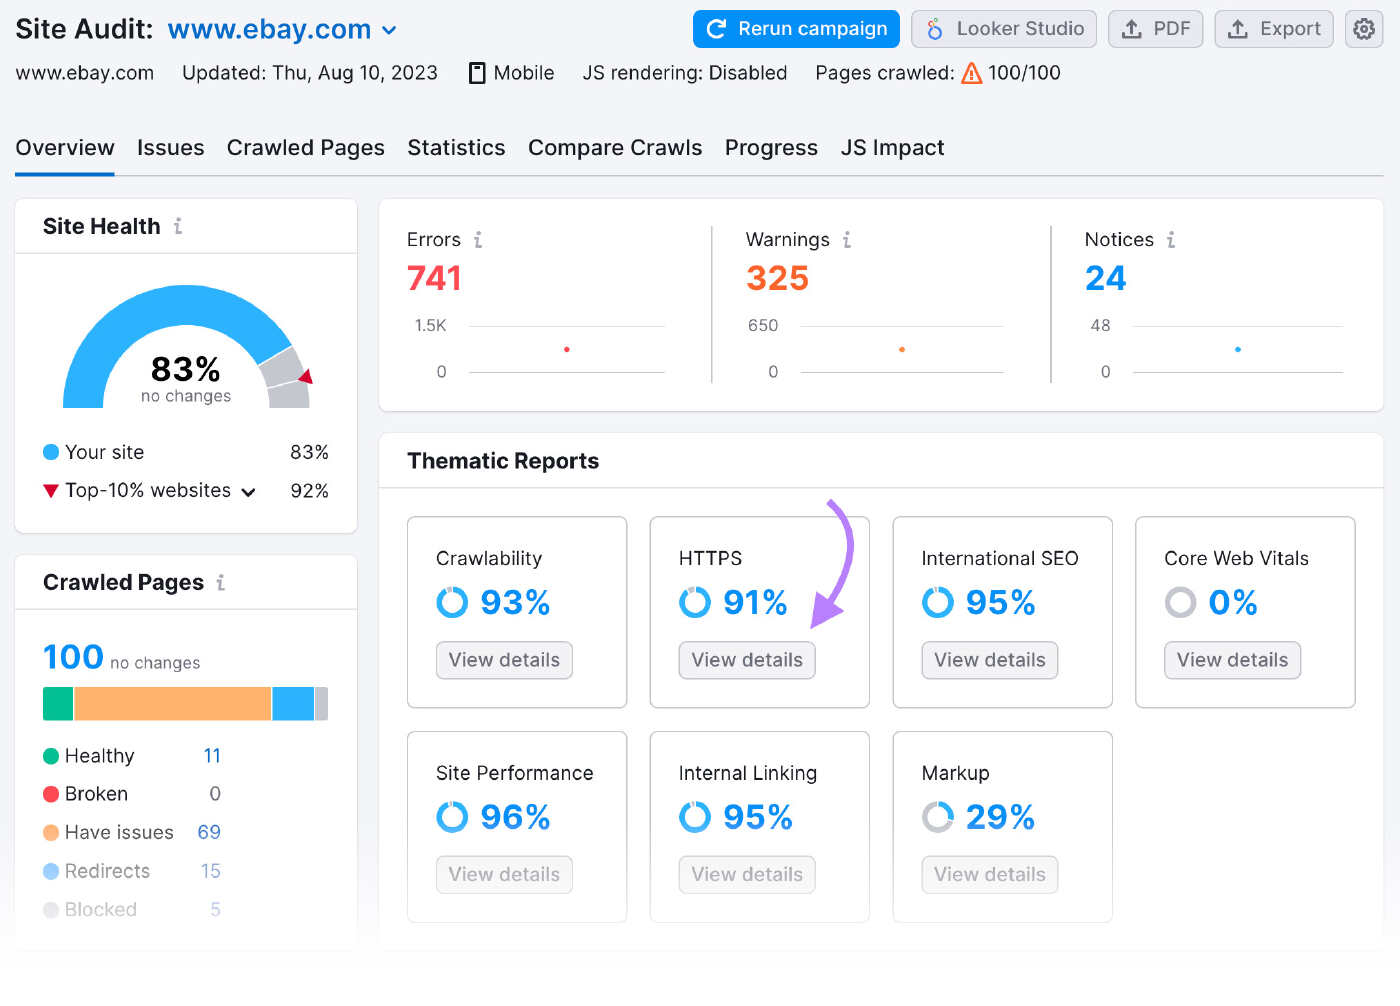
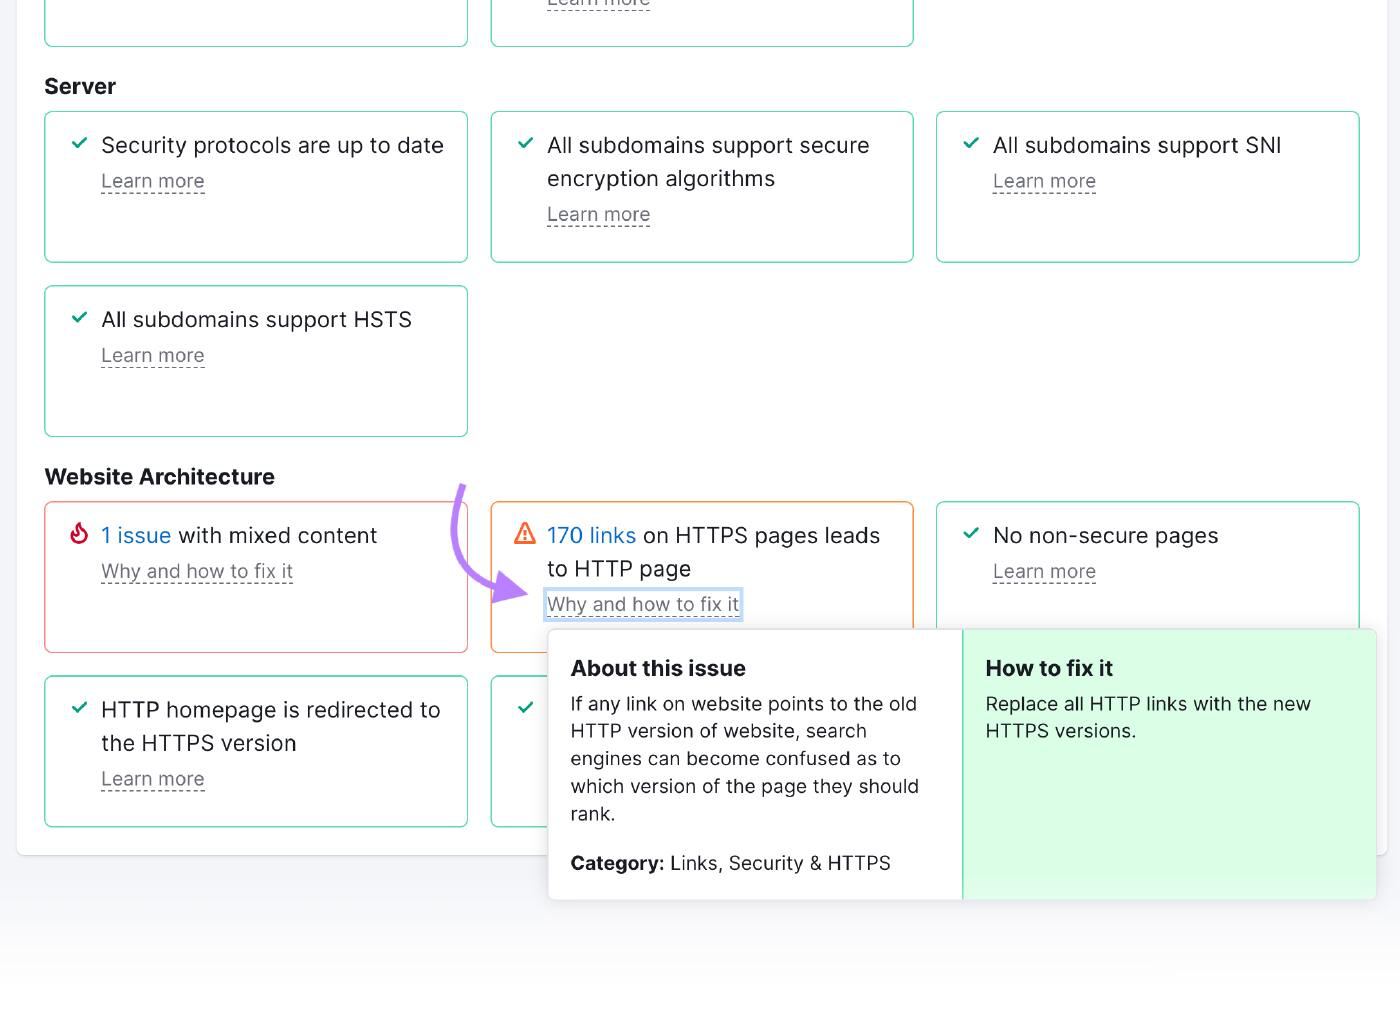
You’ll see a screen with your overall HTTPS implementation score. And a summary of the issues the tool checks for.
Like this:
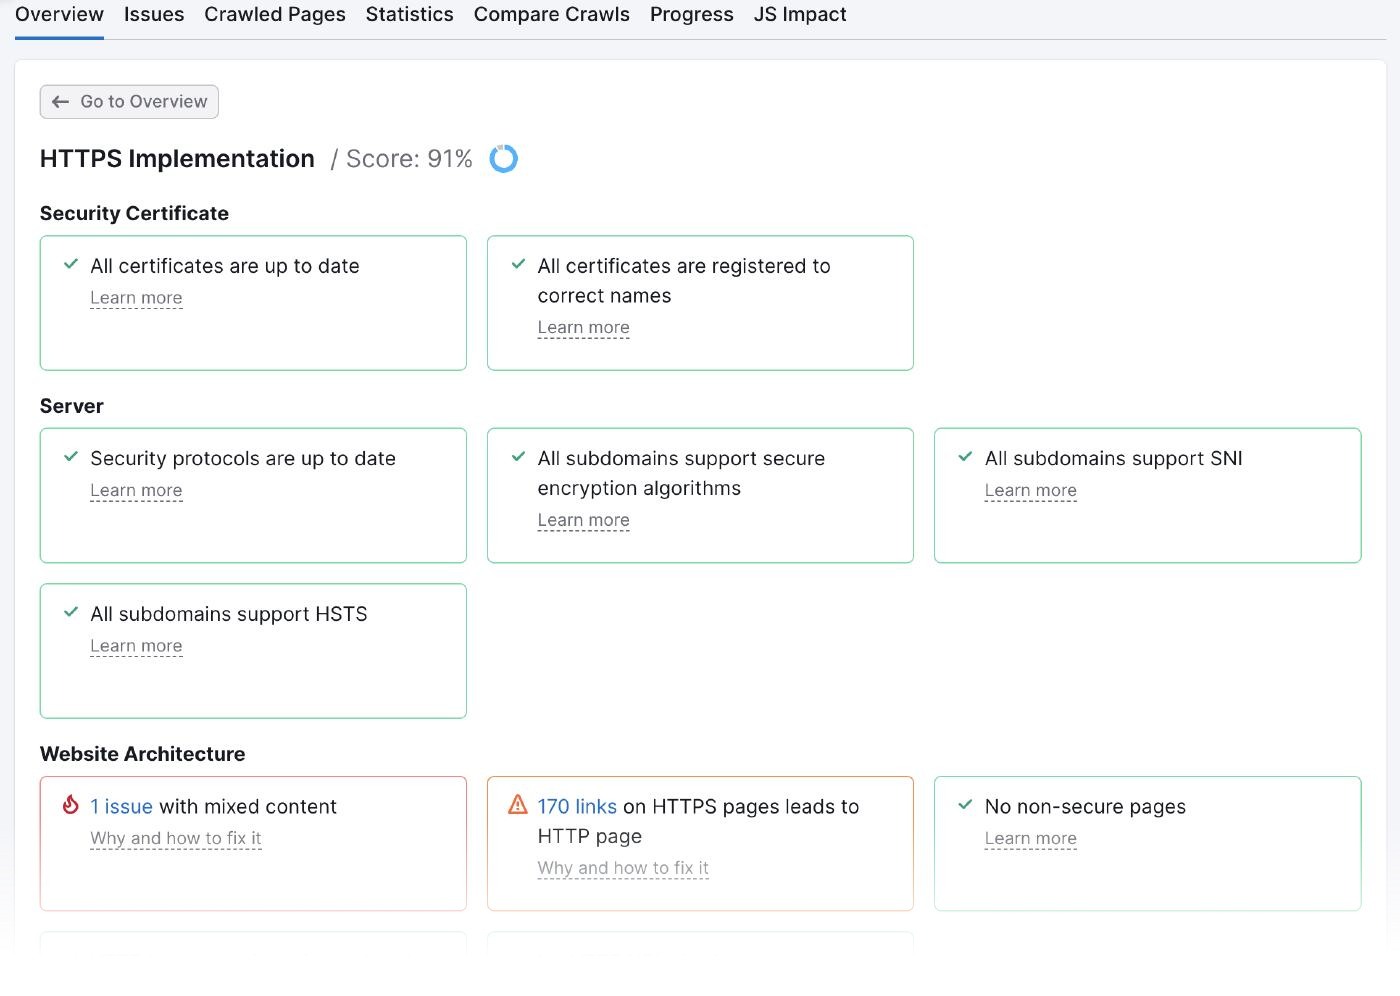
You can learn more about any issue and how to address it by clicking “Why and how to fix it.”
.svg)